Assembly Instructions for Bluesky/Pineridge/Timber

Thank you for your purchase of a Trailcraft Hardtail Mountain Bike! All Trailcraft Cycles are packed in the best quality double-wall corrugated box to protect the bike. For shipping purposes the bike has been minimally disassembled. Full assembly has been completed, though cables can stretch so there may need to be some fine tuning with the shifter barrel adjusters upon arrival or after a few rides.

 Prior to shipping:

  1. Your bike's handlebars have been removed and packaged for protection. 
  2. The shift/brake levers have been well wrapped in bubble wrap or foam packaging material. They will hang along the fork – also wrapped in bubble wrap/foam packaging. 
  3. The stem is sometimes turned inwards towards the saddle so it fits in the box.
  4. The front wheel has been removed, quick release axles have been removed and placed in a small parts cinch bag or thru-axles have been left in the fork. A long cardboard divider is installed to protect the front wheel from hitting the frame. Extra cardboard inserts or small empty boxes may be present to take up air volume for additional protection.

 Upon arrival of your Trailcraft Bicycle:

  1. Open box and remove front wheel, and cardboard inserts.
  2. Pull the bike out of the box by holding the saddle and fork leg and remove all packaging from the bicycle. Locate the cinch bag with small components. (quick release lever, pedals, grips.)
  3. Remove the front fork plastic dropout protection piece and disk brake pad spacer. DO NOT SQUEEZE FRONT BRAKE.
  4. Unpack the wheel and install the quick release skewer if it is quick release. Note that the plastic protector might pull the axle caps off the hubs of the wheel, you might have to gently pull the cap off of the round plastic hub protector and push it back into the hub end before installing the skewer and before putting the wheel on the bike.
  5. Install the front wheel in the fork. Tighten the quick release or thru axle tight enough that you have to use your palm to push it down. If a quick release skewer is on the wheel make sure the skewer tension springs are installed so the biggest part of the spring is towards the outside lever/nut and the narrowest is closest to the wheel center. Make sure the wheel is installed flush with the fork drop-outs so the brake does not rub.
  6. Loosen the top bolt and stem cinch bolts so the stem moves freely. Rotate the stem so the face plate is facing forward. If your child is on the younger/smaller side, you can also flip the stem in the negative position to get the bars lower and place the spacer(s) on top of the stem. Tighten the top cap of the stem with a 5mm allen key so there is no play in the headset spacers but the fork still moves smoothly. Alight the stem with the fork then use a T20 or 4mm allen key to cinch the stem on to the steer tube of the fork so that the stem cannot move freely. (usually torqued to 5nm)
  7. Loosen the 4 stem faceplate bolts. Remove handlebars from packaging and install on the stem. Do not over tighten stem bolts (torque to 5nm)
  8. Install right and left side brake/shift levers. The front brake lever goes on the left and the rear brake lever and shifter go on the right. If they have separate clamps, you can install the brake or shifter first for the best reach. Do not tighten yet!
  9. If you have a dropper post: install the lever on the left side. If the dropper lever has its own clamp, install it however is most comfortable for the rider. (DO NOT OVER TIGHTEN DROPPER LEVER BOLT) 3nm is enough.
  10. Remove grips, and install onto bars. Trailcraft logos up! Tighten with a 3mm allen key. There should be a 2 centimeter gap between the end of the grip and the brake/shift clamp. Angle the brake/shift levers so they are at a comfortable angle for the rider. (most find 30-45 degrees is best) Tighten the brake/shifter mount.
  11. Adjust saddle height to comfort. The saddle angle has been set parallel to the ground though a different angle may be more comfortable to the rider.
  12. Adjust fork pressure. A factory setting of 75 psi is stock, but air may have been released for packing purposes. You may need to adjust +/- depending on your child’s weight and riding level. Refer to the included suspension manual (RockShox/RST) if you have one. If a Trailcraft fork is installed we suggest setting the PSI to the same as the rider weight in Lbs and adjusting the rebound to preference.
  13. Inflate and adjust tire pressure. Please note your bike is set up with tubes unless you have requested a tubeless set up. If we have set your bike up tubeless please note that you will need to refresh the sealant with Orange Seal every 3-4 months. If your tubeless setup is flat upon arrival, re-inflate and try to keep the wheels moving for a few days (riding it works best). This allows the sealant to evenly disperse and prevent leaks. All wheels are factory installed with yellow rim tape. If you decide to set up tubeless later on you’ll need tubeless valves and sealant.  **we do not recommend inflating any tire above 40 psi due to rim specifications**
  14. Install pedals (flat, included) or your own clipless style pedals. Be sure they are properly torqued and threaded properly. The included pedals use either a 6mm or 8mm hex key instead of a standard pedal wrench. The right pedal is standard thread and has a flat spindle between the threads and the platform.The left pedal is reverse thread and has a grove on the spindle. Some pedals may have a pink dot to indicate the left pedal.
  15. Double check that all bolts are tight, quick release/thru-axles levers are tight and that the bars do not move free of the fork.

REMEMBER: You should be tightening all bolts and inspecting components after every ride to ensure everything is tight and safe to ride. As with any full suspension bike, always check pivot bolts before any ride. Here are a couple resources to help you assemble and tune your bike.

Assembly Instructions for Maxwell 24/26

Thank you for your purchase of a Trailcraft Full Suspension Mountain Bike! All Trailcraft Cycles are packed in the best quality double-wall corrugated box to protect the bike. For shipping purposes the bike has been minimally disassembled. Full assembly has been completed, though cables can stretch so there may need to be some fine tuning with the shifter barrel adjusters upon arrival or after a few rides.

Prior to shipping:

  1. Your bike's handlebars have been removed and packaged for protection. 
  2. The shift/brake levers have been well wrapped in bubble wrap or foam packaging material. They will hang along the fork – also wrapped in bubble wrap/foam packaging. 
  3. The stem is sometimes turned inwards towards the saddle so it fits in the box.
  4. The front wheel has been removed, quick release axles have been removed and placed in a small parts cinch bag or thru-axles have been left in the fork. A long cardboard divider is installed to protect the front wheel from hitting the frame. Extra cardboard inserts or small empty boxes may be present to take up air volume for additional protection.

 Upon arrival of your Trailcraft Bicycle:

  1. Open box and remove front wheel, and cardboard inserts.
  2. Pull the bike out of the box by holding back the saddle and fork leg.
  3. Remove all packaging. Note that the plastic rotor protector might pull the axle caps off the hubs of the wheel, you might have to gently pull the cap off of the round plastic hub protector and push it back into the hub end.
  4. Remove brake caliper shipping spacer (orange block) from the brake. It will pull out with a swift tug. DO NOT SQUEEZE FRONT BRAKE.
  5. Install the front wheel into the fork ensuring the thru-axle is snug.
  6. Loosen the top bolt and stem cinch bolts so the stem moves freely. Rotate the stem so the face plate is facing forward. If your child is on the younger/smaller side, you can also flip the stem in the negative position to get the bars lower and place the spacer(s) on top of the stem. Tighten the top cap of the stem with a 5mm allen key so there is no play in the headset spacers but the fork still moves smoothly. Use a T20 or 4mm allen key to cinch the stem on to the steer tube.
  7. Loosen the 4 stem faceplate bolts. Remove handlebars from packaging and install on the stem. Do not over tighten stem bolts (torque to 5nm)
  8. Install right and left side brake/shift levers. The front brake lever goes on the left and the rear brake lever and shifter go on the right. If they have separate clamps, you can install the brake or shifter first for the best reach. Do not tighten yet!
  9. If you have a dropper post: install the lever on the left side. If the dropper lever has its own clamp, install it however is most comfortable for the rider. (DO NOT OVER TIGHTEN DROPPER LEVER BOLT) 3nm is enough. If you have an integrated lever clamp install it with the brake lever. If it does not fit you may need to remove the plastic spacer on the brake lever clamp by removing the bolt and popping it out with a flathead screwdriver.
  10. Remove grips, and install onto bars. Trailcraft logos up! Tighten with a 3mm allen key. Count 2 centimeters back from the end of grip to the lever mount. Tighten the brake/shifter mount. Most feel a 30-45 degree angle is best to start out. Everyone has different lever angle preferences, though we have found 30 degree seems the most popular.
  11. Adjust saddle height to comfort. The saddle angle has been set parallel to the ground though a different angle may be more comfortable to the rider.
  12. Adjust fork pressure. A factory setting of 75 psi is stock, but air may have been released for packing purposes. You may need to adjust +/- depending on your child’s weight and riding level. Refer to the included suspension manual (RockShox/RST) if you have one. If a Trailcraft fork is installed we suggest setting the PSI to the same as the rider weight in Lbs and adjusting the rebound to preference.
  13. Inflate and adjust tire pressure. Please note your bike is set up with tubes unless you have requested a tubeless set up. If we have set your bike up tubeless please note that you will need to refresh the sealant with Orange Seal every 3-4 months. If your tubeless setup is flat upon arrival, re-inflate and try to keep the wheels moving for a few days (riding it works best). This allows the sealant to evenly disperse and prevent leaks. All wheels are factory installed with yellow rim tape. If you decide to set up tubeless later on you’ll need tubeless valves and sealant. **we do not recommend inflating any tire above 40 psi due to rim specifications**
  14. Install pedals (flat, included) or your own clipless style pedals. Be sure they are properly torqued and threaded properly. The included pedals use either a 6mm or 8mm hex key instead of a standard pedal wrench. The right pedal is standard thread and has a flat spindle between the threads and the platform.The left pedal is reverse thread and has a grove on the spindle. Some pedals may have a pink dot to indicate the left pedal.
  15. Double check that all bolts are tight, quick release/thru-axles levers are tight and that the bars do not move free of the fork.

REMEMBER: You should be tightening all bolts and inspecting components after every ride to ensure everything is tight and safe to ride. As with any full suspension bike, always check pivot bolts before any ride. Here are a couple resources to help you assemble and tune your bike.

Assembly Instructions for Maxwell 27.5

Thank you for your purchase of a Trailcraft Full Suspension Mountain Bike! All Trailcraft Cycles are packed in the best quality double-wall corrugated box to protect the bike. For shipping purposes the bike has been disassembled. Full assembly has been previously completed, though cables can stretch so there may need to be some fine tuning with the shifter barrel adjusters upon arrival or after a few rides.

Prior to shipping:

  1. Your bike has been packed in two different boxes. Wheels in one, frame in the other.
  2. Your handlebars have been removed, shift/brake levers have been well wrapped in bubble wrap or foam packaging material. They will hang along the fork – also wrapped in bubble wrap/foam packaging.
  3. The stem has been left in position on the fork steerer tube, along with the top cap and stem spacers left installed. The stem is sometimes turned inwards towards the saddle so it fits in the box.
  4. Both wheels have been removed, the thru-axles will remain in the fork and the frame. Extra cardboard inserts or small empty boxes may be present to take up air volume for additional protection.

Upon arrival of your Trailcraft Maxwell 27.5

  1. Open boxes and remove the front and rear wheels, and cardboard inserts. Note that the plastic protector might pull the axle caps off the hubs of the wheel, you might have to gently pull the cap off of the round plastic hub protector and push it back into the hub end.
  2. Pull the bike out of the second box by holding the back of the saddle and fork leg.
  3. Remove all packaging and front and rear axles from the bike.
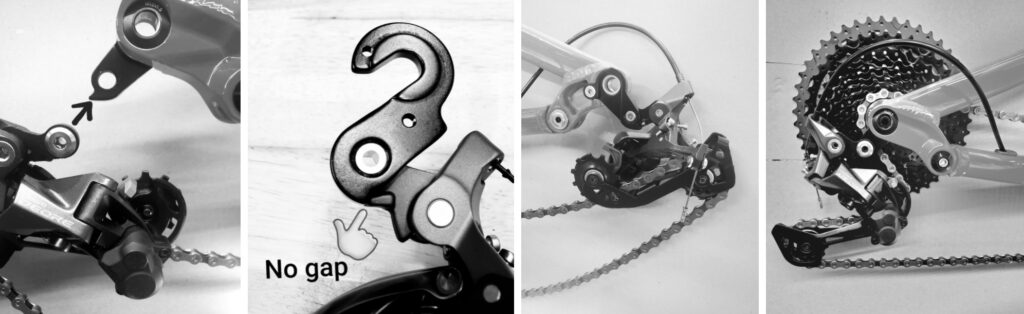
  4. Reinstall the rear derailleur onto the derailleur hanger with a 5mm allen key. Make sure that there is no gap between the point of the hanger and the stopper (see picture below).
  5. Remove brake caliper shipping spacers (orange block) from the brake. It will pull out with a swift tug. DO NOT SQUEEZE THE BRAKES.
  6. Install wheels and tighten the axles ensuring the chain is properly wrapped around the cassette and chainring. (see picture below)

  1. Loosen the top cap bolt and stem cinch bolts so the stem moves freely. Rotate the stem so the face plate is facing forward. If your child is on the younger/smaller side, you can also flip the stem in the negative position to get the bars lower and place the spacer(s) on top of the stem. Tighten the top cap of the stem with a 5mm allen key so there is no play in the headset spacers but the fork still moves smoothly. Use a T20 or 4mm allen key to cinch the stem on to the steer tube.
  2. Loosen the 4 stem faceplate bolts. Remove handlebars from packaging and install on the stem. Do not over tighten stem bolts (torque to 5nm)
  3. Install right and left side brake/shift levers. The front brake lever goes on the left and the rear brake lever and shifter go on the right. If they have separate clamps, you can install the brake or shifter first for the best reach. Do not tighten yet!
  4.  If you have a dropper post:  Install the lever on the left side. If the dropper lever has its own clamp, install it however is most comfortable for the rider. (DO NOT OVER TIGHTEN DROPPER LEVER BOLT) 3nm is enough. If you have an integrated lever clamp install it with the brake lever. If it does not fit you may need to remove the plastic spacer on the brake lever clamp by removing the bolt and popping it out with a flathead screwdriver.
  5. Remove grips, and install onto bars. Trailcraft logos up! Tighten with a 3mm allen key. Count 2 centimeters back from the end the of grip to the lever mount. Tighten the brake/shifter mount. Most feel a 30-45 degree angle is best to start out. Everyone has different lever angle preferences, though we have found 30 degree seems the most popular.
  6. Adjust saddle height to comfort. The saddle angle has been set parallel to the ground though a different angle may be more comfortable to the rider.
  7. Adjust fork pressure and shock pressures. A factory setting of 75 psi is stock, but air may have been released for packing purposes. You may need to adjust +/- depending on your child’s weight and riding level. Refer to the included suspension manual (RockShox/Fox)
    Inflate and adjust tire pressure. Please note your bike is set up with tubes unless you have requested a tubeless set up. If we have set your bike up tubeless please note that you will need to refresh the sealant with Orange Seal every 3-4 months. If your tubeless setup is flat upon arrival, re-inflate and try to keep the wheels moving for a few days (riding it works best). This allows the sealant to evenly disperse and prevent leaks. All wheels are factory installed with yellow rim tape. If you decide to set up tubeless later on you’ll need tubeless valves and sealant. **we do not recommend inflating any tire above 40 psi due to rim specifications**
  8. Double check that all bolts and axles are tight and that the bars do not move free of the fork.
  9. Install pedals (flat, included) or your own clipless style pedals. Be sure they are properly torqued and threaded. The included pedals use either a 6mm or 8mm hex key instead of a standard pedal wrench. The right pedal is standard thread and has a flat spindle between the threads and the platform.The left pedal is reverse thread and has a grove on the spindle. Some pedals may have a pink dot to indicate the left pedal.
  10. Double check that all bolts are tight, thru-axles levers are tight and that the bars do not move free of the fork.

REMEMBER: You should be tightening all bolts and inspecting components after every ride to ensure everything is tight and safe to ride. As with any full suspension bike, always check pivot bolts before any ride. Here are a couple resources to help you assemble and tune your bike.

For any questions please do not hesitate to contact us.

Email: [email protected]
Call/Text: 970-342-6147

Happy Trails!